DIY Herringbone Wood Countertops
/
When you are a blogger and you do something that hasn't been done before you have two thoughts: This is going to be huge OR this is going to be terrible. With all of the amazing comments I received I decided I must have done pretty good on this one. A few of you have even asked how to do it. So, with that I decided to share with all of you the method to my madness.
While working on my kitchen island I knew I wanted to do something I haven't seen before. Something different. Something unique. While taking a shower one night it hit me clear as day. I got dressed, walked out to the kitchen and said "baby, you are going to kill me." That's pretty much how I start conversations that I know are going to be a tough sale. He gave me "the look" and I just went along my way. I had a few scraps outside, so I grabbed them and started laying them out.

What came to me was herringbone. I don't know why it came to me, but I did. As you can see, the pieces above were small. I thought small would be good, but I didn't like it. I grabbed a bigger set of scraps and then laid them out.
I liked them but I thought I'd look at it for a few days to make sure I liked it. Even more importantly, I wanted to make sure the hubs did. He did, and it turns out, I did too.
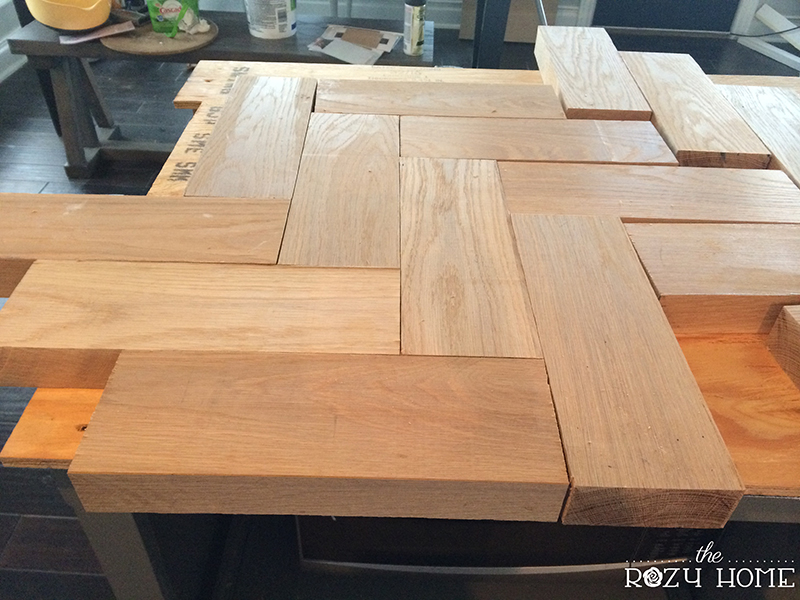
To get started, I laid a piece of 1/2" plywood on the cabinets to provide a base for the blocks. I nailed the plywood to the cabinet base and began cutting blocks. My blocks were 4 1/2 inches wide and 12 inches long. I began with the front edge of the counters.

I glued each piece down and then clamped them.

While the edges were bonding, I went around the house looking for heavy items that I could sit on the boards to help them bond. Luckily, I had a few old kettle bells that would do the job. I glued a piece, set a kettle bell on it and moved on to the next one. Because I didn't have many weights, it took me a bit to finish it (about four hours). While the pieces with weights dried, I worked on cutting the other pieces to length.

After all was said and done, I added trim pieces along the edges (1" x 3" red oak boards) and decided to put wood filler in the cracks between the boards. There are some people who may not agree with that decision 100%. I did it because it was on my island and I didn't want food crumbs to fall in between.
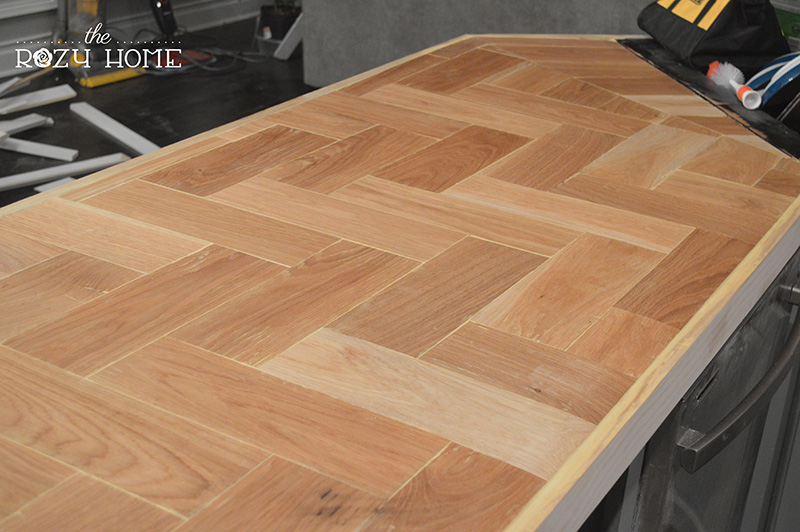
I don't know if you can see, but my bar has a lot of angles. My husband and I opted to make the sink it's own piece just in case it ended up rotting out at some point (one section is much easier to replace). We went with an under mount sink. My wonderful hubs cut out the opening using the provided template and a jigsaw. We learned pretty quickly that the different joints of the herringbone weren't really strong enough to support the weight of the sink (we learned this the hard way) so we ended up using straight boards.

With all of that finished, now came the fun part. Staining the counters.
I decided to stain them the same Black Walnut stain from Sherwin Williams I had used on the back countertops.
It was okay but not really what I wanted. I decided to deal with it but that changed when I painted the island. I opted for a blue color and I loved it. Unfortunately, it looked terrible with with the dark counters. I decided to walk away for a bit so I could figure out what I wanted to do. Somewhere during that time, I decided to gray wash it. I had no idea how to gray wash. I asked some of my amazing blogger friends and checked out Remodelaholic for any tutorials that would help. I found a few and got after it.
First, I had to sand the wood back down (to remove the black walnut stain).

The great thing about having stained them black first was that when I sanded it down, the black was in the grain of the wood and gave it depth. I actually liked it that way, but my hubs hated it. Truly hated it. (See that mess in the background? That's how a real DIY home looks during projects).
To begin, I did a wash. I mixed my cabinet color (Snowbound by Sherwin Williams) with the original island color (Classic French Gray) until I got a color I liked. Then I added water to thin it out. I applied the wash with a foam brush.

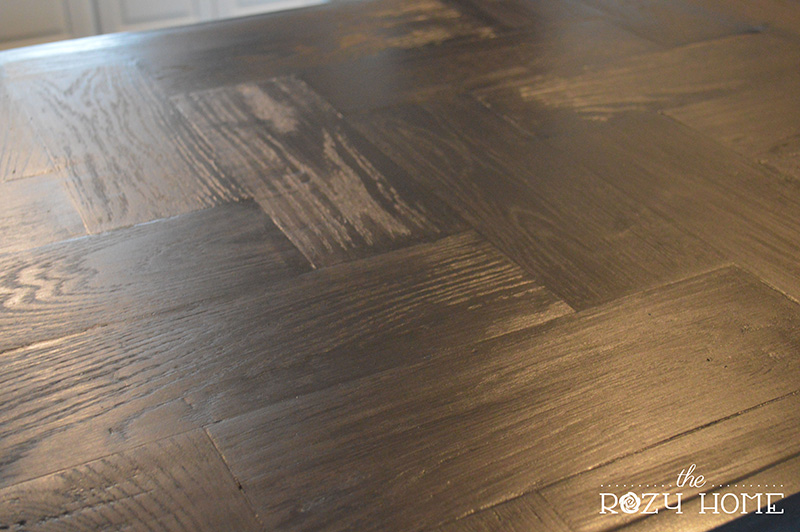
After it dried, I added a top coat of ebony Minwax stain.

Next I poured mineral spirits all over the top of it and started wiping it off. What I was left with was this:

Full disclosure (because y'all know I try to keep it real): This finish was by accident. Since I knew nothing about white/gray washing, I did it wrong. My technique was wrong and after trying over and over again, I gave up. I poured the mineral spirits on it so I could start over and voila! I got the color I wanted. That's usually how things work around here.
I did the same treatment on the edges and followed with a few coats of Watco lacquer. When all was said and done, it looked like this:


We absolutely love it. In fact, the hubs says it is the best project I've done in the house. Yes, he loves it that much. I love that it's different and I haven't seen it anywhere else. It also gives the kitchen a little bit of rustic style that falls into the old European charm I love. I know it's not everyone's taste but it's perfect in our home!
On a side note: The lines near the sink were a bit hard to blend because of all the angles. You can see them in the upper part of the photo above. What worked is something I should have done for the whole counters. I grabbed the sawdust from the wood, placed glue in the cracks and pressed the sawdust into the cracks.


Once it dried, I just sanded it down like regular wood fill. The benefit of doing this is that using sawdust leads to a better blending of the wood. I used it around the gaps in the trim on the edges and it worked beautifully!
For those who are wondering, I had the counters jointed and planed at the mill. This helped the pieces line up, but it wasn't perfect. I used a hand plane to even out the places that were a bit higher than others.
Although this project wasn't easy, it was worth the effort. I hope it inspires the rest of you to think outside of the box when working on your next home project. And who knows, you may give up halfway through and end up with something you adore! :-)
PROJECT BREAKDOWN:
Wood: 2 inch white oak wood. It was planed and jointed by the mill. Total cost (for entire kitchen) was around $1200.
Glue: I swear by Tite bond wood glue. It's proven to be the best.


