The Rozy Dining Bench
/My kids don't ask for much - bunk beds, indoor treehouses, etc. Yeah... they don't ask for much, but they ask for big. My oldest says "you can do it mom. You can build anything." No pressure there.
I haven't really felt like tackling something that big yet but I have felt so guilty about not doing something for them. Imagine my delight when the youngest asked for a bench for the dining room table, followed by "yeah mom, can we get a bench" from my oldest. You see, they are messy. I have recovered their dining chairs numerous times. At one point I bought a bench - they loved it, I hated it. It just wasn't the style I was looking for. I thought on it a bit, but wasn't sure when I would get to it. And then it happened - the hubs and kids went out of town for the weekend! I decided that while they were gone I would work on the bench and surprise them with it when they got home (I also made them indoor swings, but I'll post on that one later).

I wasn't exactly sure what I wanted to do. My mind was racing and I ended up waking up at 5 am on Saturday. Since I was up, I grabbed my notebook and headed to Starbucks to figure it out.
I knew pretty quickly what I wanted the top to be. The ends were another story. I knew I wanted them to work with the coffee table. I tried a few designs before deciding on the final one.
With that done, I headed to Home Depot to grab a few supplies and get started.
THE ROZY DINING BENCH PLANS


CUT LIST:
Written as depth x width x length
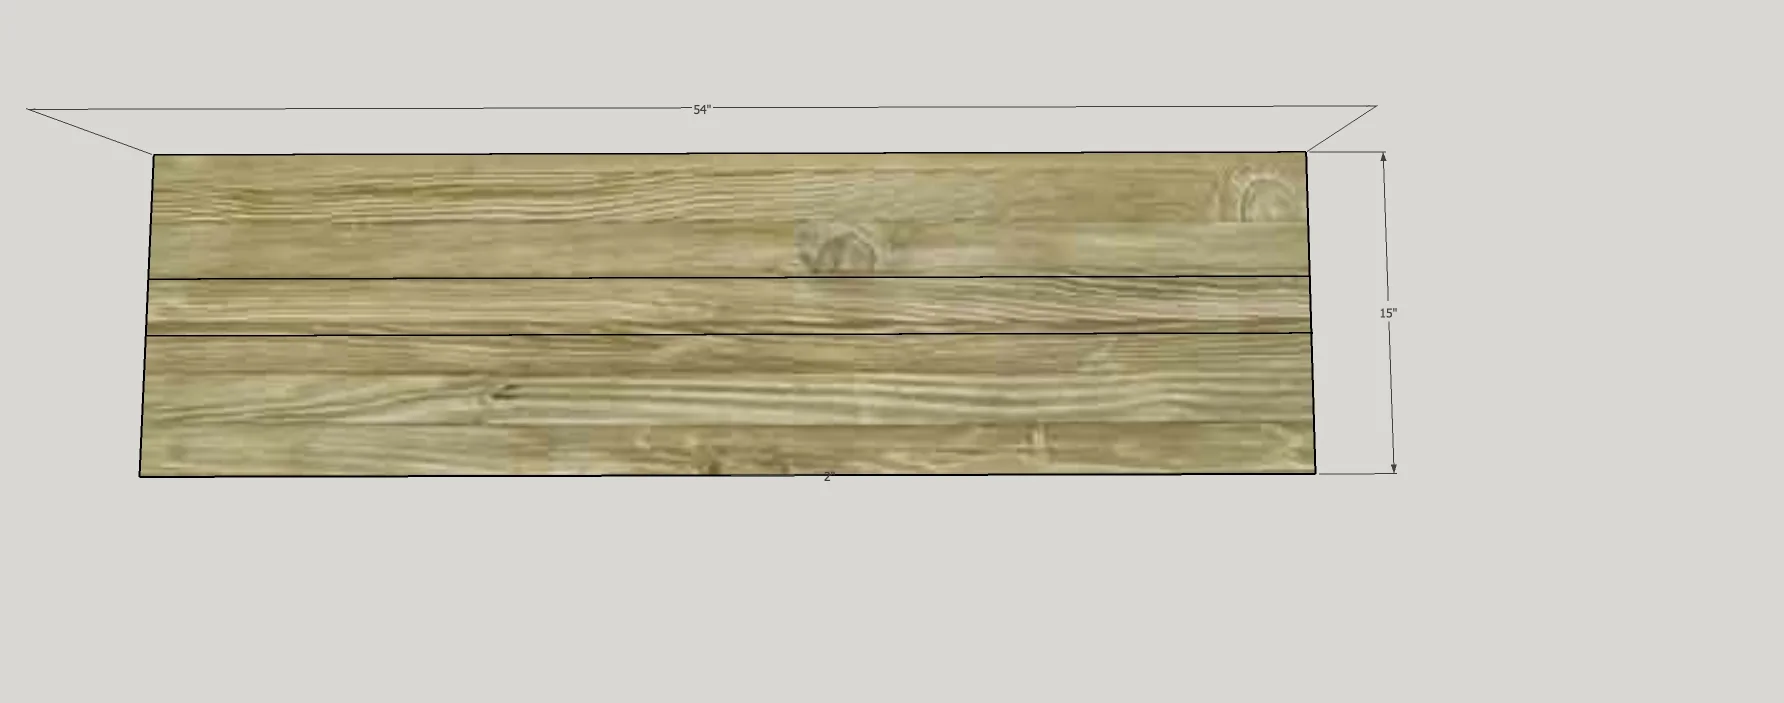
For the top:
2 - 2" x 6" x 54" white oak boards
1 - 2" x 3" x 54"' white oak board
2 - 2" x 3" x 12" white oak boards
For the base:
1 - 2" x 3" x 46" white oak board
2 - 2" x 3" x 14" white oak boards
For the legs:
4 - 2" x 2" x 13" white oak boards, mitered at 15 degrees on each end
2 - 2" x 2" x 13 1/8" white oak boards
Note: Using this leg length will result in a bench that is approximately 19 inches tall. This may be a bit too tall for most people, so adjust the length to one that works for you (standard is 17 inches).
I have been asked where I purchased 2 inch wood since HD and Lowe's only sell one inch pieces. I purchased them from Fine Lumber in Austin. They are the same people I purchased the wood for my countertops (and where I am getting the wood for my dining table). If you are planning to build, I highly suggest finding a local lumber yard and establishing a relationship with them. Not only are you supporting a local small business, but you will have an invaluable source for information and someone who knows what they are talking about to help you out with any questions you may have.
TOOLS/SUPPLIES:
Kreg Jig
3 inch pocket screws
3 inch self-drilling wood screws
Miter saw or circular saw
Drill/Screwdriver
Wood Glue (I use Titebond)
Sandpaper
Wood filler
3 - clamps (minimum 24 inches in length)
Step 1: Glue and clamp 2" x 6" x 54" white oak boards and 2" x 3" x 54"' white oak boards together. I decided to get a little creative and put the 3" board in the middle, with the 6" boards on each side.
After the glue dries, turn the top over and attach the 2" x 3" x 12" white oak boards on each end. I spaced mine in 1 inch inch and attached them with 3 inch self-drilling wood screws.

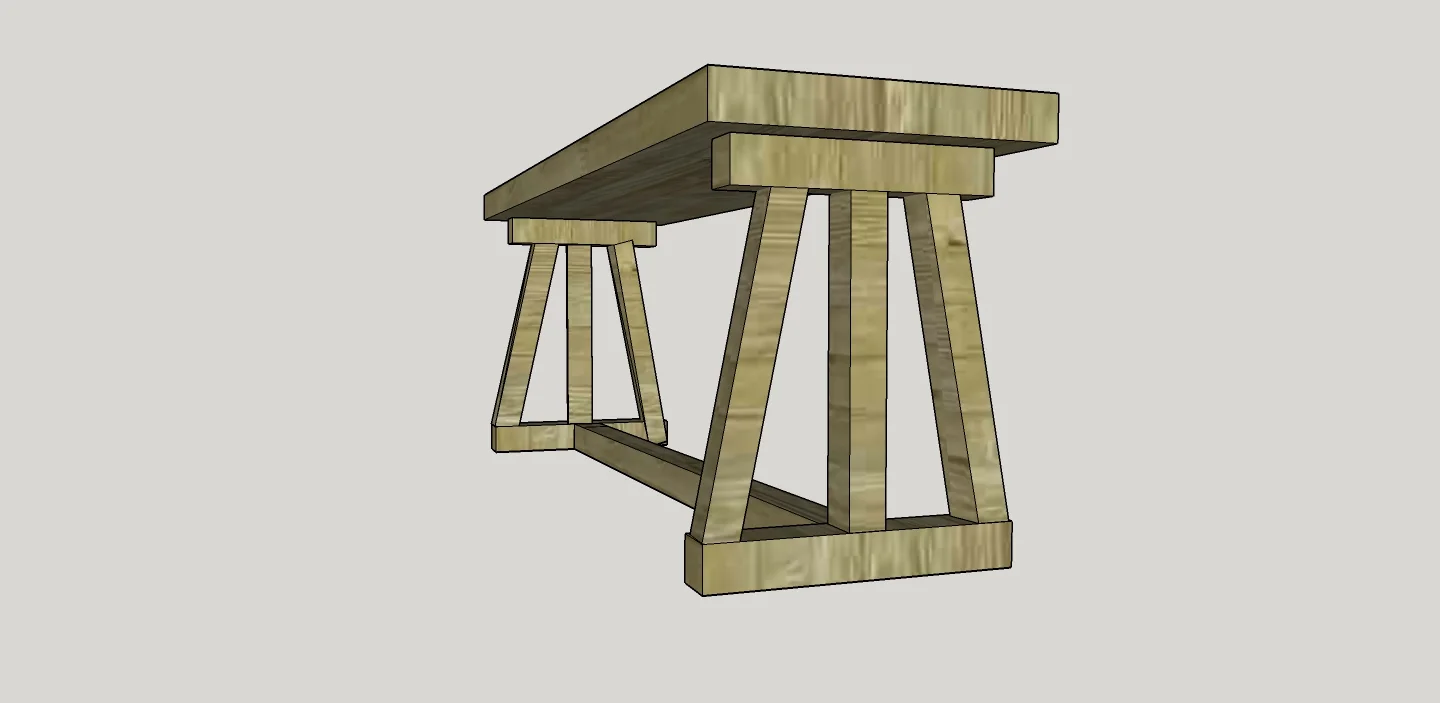
After drilling pocket holes on each end of the 2" x 3" x 14" white oak board attach a 2" x 5' x 2" white oak board on each end using 3 inch pocket screws (forming a "T" on each end).

Drill pocket holes at the top and bottom of the inside edge of mitered legs. Attach the mitered legs to the base.

Attach the base to the support piece on the underside of the top with 3 inch pocket screws. The mitered edge will line-up on the support piece on it's own. If you prefer, you can measure and determine the exact placement of each leg. Note: On the image below, I removed the top so you could see the structure better.

Turn the table over. Place the 2" x 2" x 13 1/8" white oak board between the two vertical legs pieces centered between the other legs on each end. Gently tap it in so it is snug. I like to do it this way to give it a little stability.
All that is left is sanding and staining the piece! I sanded with a 120 grit sandpaper and followed with a mixture of four or five different stain colors. And the results?


I always get asked if this was hard. No. Not at all. It was actually one of the easiest things that I have ever built. If you are thinking about getting involved in woodworking, this is the perfect project to start with!


