DIY Stacked Crown Moulding End Caps
/
Ah...terminating crown moulding - the design nuisance those of us with partial or split walls have to deal with. In most rooms crown terminates into itself because of the square/rectangular nature of the space. In rooms that have a fireplace, varying wall height or, like in my master bath, a split in the wall, you are left with 3 options: a hanging return, a corbel return or a finial return (check out this amazing article from The Joy of Moldings on the types of returns).
The first time I had to deal with a crown return was when I added crown to the kids play area. Since we have a split level, the ceiling terminates into the stairwell. Using the article from The Joy of Molding, I opted for a hanging return (right).
My second experience with terminating crown moulding was during my master bath remodel. The old shower was a partial height - approximately 6 feet - but when we remodeled the bathroom, I decided I wanted a shower that went all the way to the ceiling.
Before
During
What I didn't think about was terminating the crown - that is until 2 years later when I finally got around to installing it. I had completed most of the bathroom and then made it around to the shower wall. I knew instantly I had hit a road block. I know you are probably thinking - why not just make a hanging return like you did downstairs? That would have been great... had I not stacked the crown! Well that's not entirely true. I could have cut all 5 layers to work as a hanging return but it would have taken forever since some of the cuts were only 1/2" long. I figured with my luck I'd cut off a finger trying to miter the pieces. So I stopped. I mean, it took me 2 years to get to this stage, so why not take a break and work it out. A couple of cups of coffee (and a few days) later I came up with a plan. I decided to create custom end caps! I grabbed some spare 1/4" plywood and a pencil and decided to give it a go. And guess what? It.looks.awesome! Even better? It didn't cost me a dime!
How To Return Stacked Crown Moulding
Step 1:
Place a piece of 1/4" plywood next to the edge of the crown and trace the outline. Using a jigsaw, cut out the shape.
Step 2:
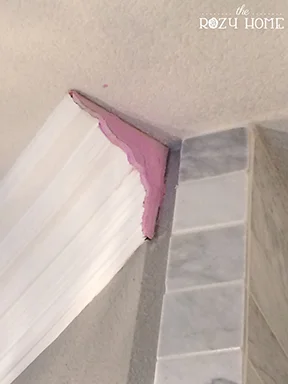
Attach the cut piece to your crown. Note: The crown I used was pretty thick so I was able to attach the wood to the crown using a brad nailer. If you have thin crown, you can attach it with adhesive (just make sure to tape it to the crown for at least 24 hours to ensures it bonds well).


Did you notice in the picture on the right that there is a gap between the crown and end piece? Apparently I cut my second layer of crown a tad bit shorter than the rest - luckily this was easily remedied with caulk.
Optional Step 3:
This step is optional - strictly driven by how Type A you are. I didn't want the end piece to have wood grain so I covered the entire thing in spackling. After it dried I just sanded it and it was ready to paint.

Step 4:
Caulk and paint the end piece.
Easy, right? Once the end caps were caulked and painted any gaps "disappeared". The entire project took less than an hour - and most of that was waiting for the spackling to dry. I dig the look and think it makes the bathroom look even more custom. And, of course, the best part was that it was free since I used on-hand supplies. Just another reason I hold on to old wood scraps!
So.... two posts in one week! Can you tell school is back in session? I swear I got more accomplished by noon yesterday (their first day back) than I did all summer. I love my kids. I love spending time with them. I also love when school starts back. :-)
YOU MAY ALSO ENJOY:


